Create Custom Shape in SwiftUI


Hi Friends,

In this tutorial I was explained about how to create a custom Shapes in SwiftUI. In SwiftUI some Shapes was provided by Apple. Like Circle, Rectangle etc.

If you need to create a new custom Shapes to show on the screen. How?

Here I have a solution for this question.

Shape is the one of the Protocol in SwiftUI. So, We have to create Struct with conform of Shape Protocol.

Here I create the Shape and named like WaveShape.

struct WaveShape: Shape {
    
    func path(in rect: CGRect) -> Path {
        var path = Path()
        
        path.move(to: CGPoint(x: rect.minX, y: rect.minY))
        path.addLine(to: CGPoint(x: rect.minX, y: rect.maxY))
        path.addLine(to: CGPoint(x: rect.maxX, y: rect.maxY - 50))
        path.addLine(to: CGPoint(x: rect.maxX, y: rect.minY))
        
        path.move(to: CGPoint(x: rect.minX, y: rect.maxY))
        path.addCurve(to: CGPoint(x: rect.maxX, y: rect.maxY - 50),
                      control1: CGPoint(x: rect.minX, y: rect.midY),
                      control2: CGPoint(x: rect.midX, y: rect.maxY))
        
        return path
    }
}

Now. Shape creation was completed. But How to test this? Here I create on View and use WaveShape in it. Just look How is that.

struct SceneTitleView: View {
    var title: String
    var height: CGFloat = 140
    
    var body: some View {
        VStack {
            ZStack {
                ZStack {
                    WaveShape()
                        .fill(Color.blue)
                        .opacity(0.4)
                        .frame(height: height)
                        .shadow(color: .black, radius: 2, x: 0.0, y: 0.0)
                    
                    WaveShape()
                        .fill(Color.blue)
                        .frame(height: height)
                        .offset(x: 0, y: -20.0)
                        .shadow(color: .black, radius: 4, x: 0.0, y: 0.0)
                }
                HStack {
                    Text(title)
                        .font(.largeTitle)
                        .fontWeight(.medium)
                        .foregroundColor(.white)
                        .padding()
                        .offset(x: 0, y: -20.0)
                    
                    Spacer()
                }
            }
        }
    }
}

struct SceneTitleView_Previews: PreviewProvider {
    static var previews: some View {
        SceneTitleView(title: "Screen Title")
            .previewLayout(.sizeThatFits)
    }
}

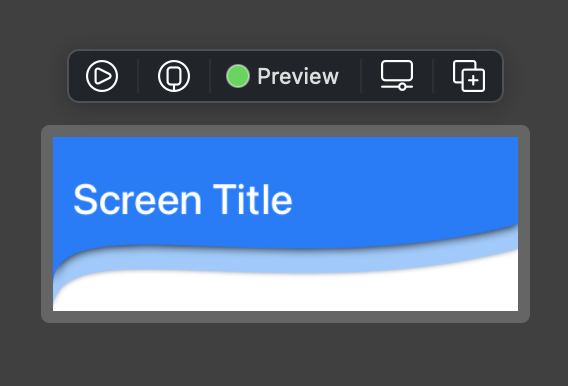
How it is? Its Awesome know.

Thanks for Visiting Subscribe my blog. Also, Click below to visit my YouTube channel.

Tic Tac Toe in SwiftUI


Hi Friends,

Here I share knowledge about game logic and UI implementation in SwiftUI.

Follow my channel on YouTube and Facebook

Part 1
Part 2
Part 3

– How to make an iOS App

Kathiresan Murugan

Design Tack Shipping screen in SwiftUI


Hi Friends,

Basic SwiftUI screen designing of Track shipping screen in SwiftUI | How to make an iOS App


– How to make an iOS App

  Kathiresan Murugan

Subscribe

https://www.youtube.com/channel/UC6nWavOGjtz8bhwUTBoQWFg

Basic design on SwiftUI


Check my channel on YouTube and subscribe.

Hi Friends,

Learn SwiftUI from YouTube by my channel. Subscribe my channel and learn more and more.

SwiftUI + Combine.Framework


Hi Friends,

Apple introduced SwiftUI and Combine.Framework at WWDC'19
SwiftUI is most powerful UI Framework better than UIKit
SwiftUI has No Storyboard, No Xib, No AutoLayout, No ViewController

Here I'm using Combine.Framework for value passing from Model class to SwiftUI ContentView

Implementing Model class

import SwiftUI
import Combine

struct User: Identifiable {
    let name: String
    let country: String
    let gender: String
    let id = UUID()
}

class Model: ObservableObject{
    
    @Published var users: [User] = []
    
    func loadValue() {
        users = [.init(name: "John", country: "US", gender: "Male"),
                 .init(name: "Jolye", country: "US", gender: "Female"),
                 .init(name: "Kathiresan", country: "India", gender: "Male"),
                 .init(name: "Kattte", country: "Canada", gender: "Female")]
    }
}

Implementing View

import SwiftUI
import Combine

struct ContentView: View {
    
    @ObservedObject var model = Model()
    
    var body: some View {
        
        VStack {
            Button(action: {
                       self.model.loadValue()
                   }, label: {
                       Text("Load Values from Model")
                   })
            
            List(self.model.users) { item in
                Text(item.name)
                Spacer()
                Text(item.country)
            }
        }
    }
}

Also learn on YouTube. Subscribe my channel and learn more and more

– How to make an iOS App
kathiresan Murugan