Click below link in Apple device and subscribe the calendar on your device.
How to add Watermark on UIImage in swift
Hello,
Today we are going to learn how to add watermark(Text/ Sign) on UIImage. This is a simple way to add text in particular position.
Implement this function in UIImage extension
#01 Implement Add Text on Image
// MARK: - Adding texts/ Water mark on image
    func addTextOnImage(drawText text: String, atPoint point: CGPoint? = nil) -> UIImage {
        let textColor = UIColor.white
        let textFont = UIFont.custom(.bold, 40)

        let scale = UIScreen.main.scale
        UIGraphicsBeginImageContextWithOptions(size, false, scale)

        let textFontAttributes: [NSAttributedString.Key : Any] = [NSAttributedString.Key.font: textFont,
                                                                  NSAttributedString.Key.foregroundColor: textColor,
                                                                  NSAttributedString.Key.backgroundColor: UIColor.black.withAlphaComponent(0.3)]
        draw(in: CGRect(origin: CGPoint.zero, size: size))

        let rect = CGRect(origin: CGPoint(x: 20, y: size.height - 120), size: size)
        text.draw(in: rect, withAttributes: textFontAttributes)

        let newImage = UIGraphicsGetImageFromCurrentImageContext()
        UIGraphicsEndImageContext()

        return newImage ?? UIImage()
    }
Call the function like .addTextOnImage(drawText: "Happy Coding !")
Hope you learn this logic today. Implement in your project and enjoy.
Thanks,
Happy Coding !
How to compressed an UIImage in Swift
Hello,
Here we are going to learn how to compress our UIImage and then how to convert Base64 String.
Let’s implement one by one.
Implement these functions below UIImage extension
#01 Compress Image Data
/// Compress image to Data
/// - Returns: Compressed Data of UIImage.
public func compressedImageData() -> Data? {
        return self.resized(sizeReduce: 0.5)?.jpegData(compressionQuality: 0.3)
}
Here I implemented a function of CompressedImageData has do an image real dimension reduce to 50% and then convert the jpeg data quality to 30%. So, obviously we can get the compressed image.
Here! What is .resized(sizeReduce:)
Resized function will do a job of reduce image dimension 100% – 10%. just look below function implementation.
     // MARK: Resized.

    /// Resized with reduce percentage
    /// - Parameters:
    ///   - sizeReduce: 0.1 - 1.0
    ///   - isOpaque: opacity
    /// - Returns: Rendered image.
    func resized(sizeReduce: CGFloat, isOpaque: Bool = false) -> UIImage? {
        let canvas = CGSize(width: size.width * sizeReduce, height: size.height * sizeReduce)
        let format = imageRendererFormat
        format.opaque = isOpaque

        return UIGraphicsImageRenderer(size: canvas, format: format).image {
            _ in draw(in: CGRect(origin: .zero, size: canvas))
        }
    }
#02 Convert an Data to Base64
/// Convert to Base64 string
/// - Returns: image in base64 string
public func base64String() -> String? {
        return compressedImageData()?.base64EncodedString(options: .lineLength64Characters)
}
This function of Base64String will do a job like convert Base64String from CompressedImageData().
So, Just we call a function like .base64String() we achieved. Try this logic in your application. check it.
I hope you learn this.
Thanks You,
Happy Coding 🙂
iOS 15, iPadOS 15 Compatible devices. – WWDC 21

Then iPadOS

Create Custom Shape in SwiftUI
Hi Friends,
In this tutorial I was explained about how to create a custom Shapes in SwiftUI. In SwiftUI some Shapes was provided by Apple. Like Circle, Rectangle etc.
If you need to create a new custom Shapes to show on the screen. How?
Here I have a solution for this question.
Shape is the one of the Protocol in SwiftUI. So, We have to create Struct with conform of Shape Protocol.
Here I create the Shape and named like WaveShape.
struct WaveShape: Shape {

    func path(in rect: CGRect) -> Path {
        var path = Path()

        path.move(to: CGPoint(x: rect.minX, y: rect.minY))
        path.addLine(to: CGPoint(x: rect.minX, y: rect.maxY))
        path.addLine(to: CGPoint(x: rect.maxX, y: rect.maxY - 50))
        path.addLine(to: CGPoint(x: rect.maxX, y: rect.minY))

        path.move(to: CGPoint(x: rect.minX, y: rect.maxY))
        path.addCurve(to: CGPoint(x: rect.maxX, y: rect.maxY - 50),
                      control1: CGPoint(x: rect.minX, y: rect.midY),
                      control2: CGPoint(x: rect.midX, y: rect.maxY))

        return path
    }
}
Now. Shape creation was completed. But How to test this? Here I create on View and use WaveShape in it. Just look How is that.
struct SceneTitleView: View {
    var title: String
    var height: CGFloat = 140

    var body: some View {
        VStack {
            ZStack {
                ZStack {
                    WaveShape()
                        .fill(Color.blue)
                        .opacity(0.4)
                        .frame(height: height)
                        .shadow(color: .black, radius: 2, x: 0.0, y: 0.0)

                    WaveShape()
                        .fill(Color.blue)
                        .frame(height: height)
                        .offset(x: 0, y: -20.0)
                        .shadow(color: .black, radius: 4, x: 0.0, y: 0.0)
                }
                HStack {
                    Text(title)
                        .font(.largeTitle)
                        .fontWeight(.medium)
                        .foregroundColor(.white)
                        .padding()
                        .offset(x: 0, y: -20.0)

                    Spacer()
                }
            }
        }
    }
}

struct SceneTitleView_Previews: PreviewProvider {
    static var previews: some View {
        SceneTitleView(title: "Screen Title")
            .previewLayout(.sizeThatFits)
    }
}
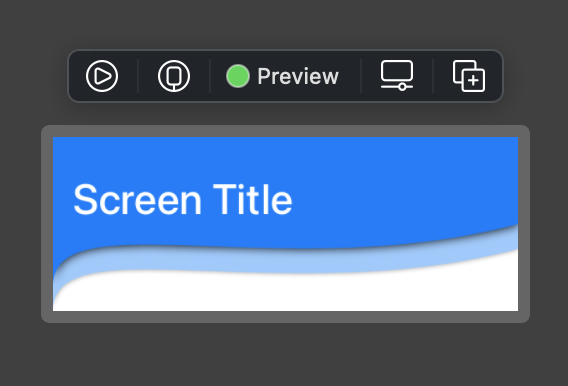
How it is? Its Awesome know.
Thanks for Visiting Subscribe my blog. Also, Click below to visit my YouTube channel.
Debug: Print class, function, line number swift
Hi Guys,
Here I created new Function to print message, class name, function name and line number.
// Can call like.
DebugPrint.message("Test")
// Implementation
enum DebugPrint {

    static func message(_ text: String,
                 _ fileName: String = #file,
                 _ function: String = #function,
                 _ line: Int = #line) {
        print("\(text) \t fileName: \((fileName as NSString).lastPathComponent), function: \(function), line no: \(line)")
    }
}
-ktrkathir
How to Change colour of image while runtime in Swift
We don’t need to use same template type of images for different colours. We can use RenderingMode API to present with tintColor.
Find UDID, Serial number, IMEI number for iPhone or iPad
Quick demo to find UDID for iPhone and iPad.
Here is a easy way to find UDID of your iOS Devices. A few simple steps to find UDID, serial number, IMEI number of your iPhone or iPad.
If you bought a new iPhone or iPad means How to find your unique id of UDID, serial number by using Mac.
You can share this video to someone and get UDID of their iOS devices.
I have Mac
I Dont have Mac
Design a screen using ScrollView + StackView
In this Swift tutorial. I discussed about How to Design a screen using UIScrollView embed with UIStackView and with AutoLayout Constraints.
Text to Speech using AVKit with customisation options designed in UI
In this Swift tutorial. I implemented Text to speech application using AVKit.
Here I used NSLinguisticTagger, AVSpeechSythesizer, AVSpeechUtterance and Implemented User interface for customisations.
Explanation: @escaping
Here I discussed about escaping closures. Syntax, Implementation and Use cases.
Create async functions with @escaping closures.
Definition: you can write @escaping before the parameter’s type to indicate that the closure is allowed to escape.
Explanation: Tuples
What is Tuples ? Where we can use Tuples ? and How to implement ?
Tuples is helps to return a different types of values in single function.
Explanation: UserDefaults iOS
How to save and retrieve data using UserDefaults in Swift.
UserDefaults is an important data storage instance in Swift. Here we can store Any data type values by using Key value pair.
Local Notification with Attachments in Swift
Attach a gif on Local Notification (UNUserNotification) and build a perfect iOS Application.
And also we can attach Image, Video, and Audio. Notification will react based on the attachment extension.
Daily Reminder Local Notification Swift 5.2
Implementing a Daily Reminder Local Notification (UNUserNotification) and build an iOS Application | Xcode 11 | Swift 5.2
No real device. No Certificate. No Provisioning profile.
Here I used UserNotification framework and implemented UNCalendarNotificationTrigger, DateComponents to set notification on every day at 12 pm.
Implement Action button for Local notification
Implementing a Action button for Local Notification (UNUserNotification) and build an iOS Application | Xcode 11 | Swift 5.2
No real device. No Certificate. No Provisioning profile.
Implement Scheduled Local Notification | Xcode 11.5 | Swift 5.2.4
In this Swift tutorial. I discussed about Implementing a Scheduled Local Notification (UNUserNotification) and build an iOS Application | Xcode 11 | Swift 5.2
Simulate APNS Remote Notification on simulator iOS 13.5 and above | Xcode 11.5
Hi EveryOne!
In this Swift tutorial. I discussed about how to trigger a push notification to Simulator iOS 13.5 and above | Xcode 11.5 and above.
No Certificate. No ProvisioningProfile. No Third party websites. No .p12 file required.
Terminal command to send Push notification to simulator.
Syntex:
$ xcrun simctl push <simulator identifier> <bundle id> <file.apns>
Sample command:
xcrun simctl push 0DA13FCF-A6FA-4AA2-95A2-95AADF8EFEAD com.ktrkathir.LeftSideMenu sample.apns
Sample APNS Json file
{
    "aps" : {

        "alert" : {

            "title" : "Sample Push",

	    "body": "Example push notification"
        },

        "sound": "default"
    }
}
Apple Doc: Generate remote notification APNS format
Side menu implementation Swift
A Step by step tutorial about Integration and Implementation of Left sideMenu and build an iOS App
Here I Implemented tableView with SideMenu SDK to Xcode project using Swift Package Manager.
We can design our own ViewController to Left slide menu and also customise what we need.
Design static UITableView using Enum | Swift 5.2 | Xcode 11
A Step by step tutorial about Designing a static UITableView using Enum to build an iOS App
For TableViewCell content I didn’t create any Struct or class for that. I choose a better way to create model class by Enum class and add some extension variable for tableview datasources.
